Showing posts with label baking. Show all posts

Saturday, 26 July 2014

Hello?

I might be talking to the spiders creeping around the corners of this blog, but I'm here to turn on the lights and wipe the dust away – second year at college has been crazy, but these are all you need to know about the past few months of the gastronomy of student life:

The most important things I've learnt from student living:
  1. Cream cheese and honey on toast makes a bangin' breakfast. Richard claims it to be "like cheesecake on toast". TIP: Stuff warm pita with the same stuff. It's ridiculous.
  2. If you don't buy it, you won't eat it. Do you really need a pack of McVitie's Chocolate Digestives every time you pass (or delibrately browse) the biscuit section in Tesco's?
  3. Light butter spread is pretty useless. I dunno, it might help with the calories and saturated fat and whatever, but it barely tastes like the real deal!
  4. Never let yourself run out of milk. Milk is the loo roll of the refrigerator. Gotta have it at all times. No milk means dry cereal, black coffee, black tea, no means of making hot chocolate, pathetic scrambled eggs, no impromptu pancakes... and the list goes on.
  5. Abstain from purchasing cereal. Mostly if you're someone like me who cannot resist eating cereal out of the box, cinema-popcorn style. I've opted for porridge oats, which are less edible straight out of the box.
  6. Frozen food is your best friend. Meat, veg, pizza, pies, ready meals – the best thing to do after a long day at dance college is sticking something into the oven for dinner which hardly cost anything.
  7. Sweet potato fries are the ish. Slice them up, stick them into the oven with oil, mixed spice and salt, and you're ready to go.
  8. Portion minced meat before freezing. It's not much fun digging your pathetic knife into a solid block of meat when all you want is just enough for two portions of spaghetti bolognese.
  9. Raw mushy sausages can become meatballs. Feeling like bits and bobs instead of rods? Worried that sausages and pasta don't look very sophisticated? Cut up raw sausages before cooking.
  10. You can indeed accomplish an epicmealtime 'handle it' recipe. I've done it, and it was glorious.
  11. Just take the mould off the cheese, nobody's going to die. Cream cheese and cheddar alike – I'm still here, aren't I?
  12. Don't look down upon a roasted onion half. It's gooood.
  13. Make and keep tons of tiny pancakes to use up expiring milk and leftover chocolate chips. You're welcome. Keep them in the freezer for an eternal breakfast backup plan.
It's been two years of student-living in an English country, but there are wonders undiscovered, the gaps of which my English boyfriend has happened to fill with his superior knowledge.

  1. Fire ovens still exist. Richard had one in his student house.
  2. Gravy granules! I'm learning.
  3. Golden syrup or honey with beef and gravy. *Melts*
  4. Mixed herbs can save your life. A sprinkle does magical wonders to almost anything.
  5. Sweet and sour sauce with spaghetti is legit.
  6. Actually, anything with pasta can be dinner.
  7. Yes, even gravy.
Other stuff you should totally try making:

  1. Peanut butter and banana milkshake: Blend two generous dollops of peanut butter, a chopped up banana, one or two tsp of sugar, and milk to cover 3/4 of what you've already got in the blender.
  2. Peanut butter and banana porridge: Stir in mashed banana and however much peanut butter into your warm porridge for an energising start to the day! Much needed when you start with a ballet class every morning at college.
  3. Nutella and peanut butter sandwich: I don't know why most people I speak to haven't tried this yet. Spread one slice of warm toast with nutella, the other with peanut butter, and stick them together. Watch them ooze and fuse. Enjoy.

Wednesday, 27 November 2013

New York Style Cheesecake


This recipe produces a perfect cheesecake – creamy, sweet, and addictive. I mean. Check. It. Out. New York Style, no less.

This sunshine circle of happiness is brought to you (and me) by Chef John from foodwishes.com.


New York Style Cheesecake
(recipe from foodwishes)

Ingredients:
3 tbsp melted butter
18 graham crackers/digestive biscuits, crushed finely
¼ cup all-purpose flour
1 cup sour cream
1 tbsp vanilla extract
4 8oz packages of cream cheese
1½ cups white sugar
⅔ cup milk
4 eggs
1 tsp finely grated lemon zest
1tsp finely grated orange zest

Directions:

1. Preheat oven to 175ºc.
2. Lightly grease a 9-inch springform pan.
3. Mix crackers/biscuits and melted butter in a bowl until evenly moistened. Press crumb mixture into the bottom and about half an inch up the sides of the springform pan.
4. Whisk flour, sour cream and vanilla extract in a bowl, and set aside.
5. Stir cream cheese and sugar with a wooden spoon in a large bowl until evenly incorporated, about 3 to 5 minutes.
6. Pour milk into cream cheese mixture and whisk until just combined.
7. Whisk in eggs, one at a time, stirring well after each addition.
8. Stir in lemon and orange zests, and sour cream mixture. Whisk until just incorporated.
9. Pour mixture into springform pan and bake for about an hour, when the edges have puffed up slightly and the surface of the cheesecake is firm except for a small spot in the middle which should jiggle when the pan is gently shaken.
10. When the baking time is over, turn off the oven and let it cool in the oven for 3 to 4 hours to prevent cracks in the cheesecake.

Saturday, 2 November 2013

Frozen Cream Cheese Frosting Sandwich


So you made some pumpkin cupcakes or carrot cake last night, and topped it with cream cheese frosting, which everybody knows is the best thing ever.

And then...

...plot twist: There's leftover cream cheese frosting.

But wait! Before you stick your finger into the bowl or hold the piping nozzle over your mouth, run out to the shops (or open your cupboard if you're lucky enough) and grab a packet of digestive/tea biscuits – that's all you need for these frozen cream cheese frosting sandwiches.


Frozen Cream Cheese Frosting Sandwiches
makes ~15 sandwiches
3 tbsp unsalted butter, at room temperature
2 oz cream cheese, at room temperature
¾ cups icing sugar
¼ tsp vanilla extract
¼ tsp cinnamon (optional)
~30 digestive/tea biscuits

OR

how ever much cream cheese frosting you have left
how ever much digestive/tea biscuits is available to you

Instructions (really?)

To make the frosting:

1. In an electric mixer with a paddle attachment, (I used whisk attachments and it was fine) beat the butter and cream cheese on medium speed until light and fluffy, about 2-3 minutes.
2. Reduce the speed and gradually add icing sugar, beating until just incorporated.
3. Add vanilla and cinnamon until well combined.
4. Increase speed to medium high and beat until frosting is light and fluffy, about 1-2 minutes.

Assembly:

1.Pipe or spread cream cheese frosting generously on the flat side of one biscuit, leaving a little bit of space on the edges for the frosting to ooze out with pressure, and cover with the flat side of another.
2. Freeze for at least an hour.

The end product will be a sweet, delicious and moreish dessert snack which is super easy to make. The frosting hardens into an ice cream-like texture which holds itself well between the biscuits. Really, there's no excuse not to make these.

Sunday, 27 October 2013

Homemade Potato Crisps

My flatmates are going home for the half-term break week, and have left behind some excess Maris Piper potatoes, so I thought that I'd try to make some potato chips. (Or crisps, as the British say)


They may look pretty decent, but these were the few successful, presentable ones. Many of them browned nastily, affecting the taste, and most of them crumbled after boiling. (Apparently boiling is only ideal for red potatoes)

If you haven't already guessed, this isn't a tried-and-tested-and-succeeded recipe post! The crisps were worth a try, but I'd much rather buy a packet of Walker's Extra Crunchy for less than a pound, than go through the process of slicing, seasoning and flipping. They've also got to be cooked at a temperature of about 220 ºC, which makes me cringe at the thought of my energy bills. #studentliving They don't even taste as good as a packet of crisps. They may be healthier, but if I'm going to have potato slices cooked in oil, it's going to be unhealthy no matter what, so I'd rather just go all the way and get me some Walker's.


If you doubt my beliefs, which might be a good thing to do, and really must have the recipe, here's what I've come up with from referring to Martha Stewart and Home Cooking Adventure.

Baked Potato Chips

Ingredients
3 medium potatoes
salt
ground black pepper
3 tbsp olive oil

Optional:
ground herbs of your choice (I used oregano)
cayenne pepper

Instructions
1. Preheat the fan oven to 200 ºC and lightly grease a few baking sheets.
2. Peel the potatoes and slice them potatoes as thinly as you can with a knife.
3. In a big bowl, combine all the other ingredients. Use your fingers to mix and coat the potato slices in the bowl.
4. Lay the potato slices out on the baking sheets in a single layer and bake for 15 minutes, then take them out and flip each crisp over, to bake for another 15 minutes.

Monday, 7 October 2013

Perfect profiteroles


Just for the record, I made 50 of these on Saturday night, and they were gone by Monday night.

It is week three of my domestic independence here in London, and I've not had food poisoning, so all is well. To take a break from the long school days and exercise some productivity, I decided to bake some profiteroles, which doesn't require complicated ingredients nor much fancy equipment, perfect for a new-ish kitchen.


Perfect Profiteroles
makes ~30 small profiteroles
(adapted from essential desserts)
Prep time: 30 minutes
Cooking time: 1 hour

Extra equipment

Piping bag with long, narrow nozzle (How to make a DIY piping bag)

Ingredients

Choux Pastry:
50g (1¾ oz) butter
90g (3¼ oz/ ¾ cup)plain all-purpose flour, sifted twice
3 eggs, lightly beaten

Filling:
375ml (13 fl oz/ 1½ cups) milk
4 egg yolks
80g (2¾ oz/ ⅓ cup) caster sugar
30g  (1 oz/ ¼ cup) plain all-purpose flour
1 teaspoon vanilla extract

Topping:
110g (3¾ oz) dark chocolate
2 teaspoons vegetable oil

Instructions

To make the filling:
1. Put the milk in a small saucepan and bring to a boil. Set aside while quickly whisking the yolks and sugar in a bowl until combined.
2. Whisk the flour into the egg mixture.
3. Pour the hot milk slowly onto the egg and flour mixture, whisking constantly.
4. Wash out the pan, return the milk mixture to the pan and bring to a boil, stirring constantly with a wooden spoon until the mixture boils and thickens. Boil for two minutes, stirring often.
5. Transfer to a heatproof bowl and stir in the vanilla extract.
6. Lay plastic wrap directly over the surface of the mixture to prevent a skin from forming, then refrigerate until cold.

To make the choux pastry:
1. Preheat the oven to 190ºC, set on fan mode, and line two baking trays with greaseproof paper. (210ºC for regular oven setting)
2. Put the butter in a large heavy-based saucepan with 185ml (6fl oz/ ¾ cup) water and stir over medium heat until the mixture comes to the boil. Remove from the heat and quickly beat in the flour with a wooden spoon.
3. Return to the heat and continue beating until the mixture comes together in a lump and leaves the sides of the pan easily. Allow to cool slightly.
4. Transfer to a bowl (I used a standing mixer for this) and beat to release as much heat as you can. Very gradually add in beaten egg, until all the egg is added and mixture is thick and glossy – a wooden spoon should stand upright in it. If it is too runny, egg has been added to quickly, and you have to beat for several more minutes until it thickens.
5. Sprinkle the baking trays with water to create steam for rising the pastry in the oven.
6. Spoon rather small heaps (they rise a lot) of the mixture onto the baking trays, and leave room for spreading.
7. Bake for roughly 20 minutes, (20-25 for regular oven setting) or until browned and hollow-sounding, then remove and make a small hole in the base of each puff with a skewer. Return to the oven for 5 minutes to dry out. Cool on a wire rack, bottom-side up.

Filling the choux pastry:
1. Pipe the custard filling generously into the choux puffs with your smallest long piping nozzle through the hole in the base. The weight of the profiterole should increase noticeably after filled.

To make chocolate topping:
1. Chop the chocolate and put it in a large heatproof bowl with the oil.
2. Bring a saucepan of water to the boil and remove it from the heat, and sit the bowl over the saucepan, ensuring that the bowl does not touch the water.
3. Stir occasionally until the chocolate has melted and the mixture is smooth.

Finally...
1. Dip the top of each profiterole in the chocolate.
2. Allow to set or refrigerate in airtight containers before serving.


It was actually pretty easy to do, just quite time-consuming! But it's all worth it, plus you get to lick custard out of the saucepan and the piping bag. Also, don't forget that remaining chocolate dipping, which deserves to be eaten straight out of the bowl with a spoon!

On a side note, I was really lucky to have the sun shining gloriously into my bedroom the next day, through my sheer white curtains, onto a broad windowsill – is this the perfect food-photography setup or what? Who needs fancy studio lights? (Okay, granted, I had a DSLR camera on a tripod with big fat zoom lens)


Let's just hope that the sun decides to shine every time I bake something new. London, be generous!

Wednesday, 4 September 2013

Oreo Snickerdoodle Cookie Cake Bars


If there's one thing I know for sure, it is that baking is not for people who can't handle mess. These tediously-named Oreo Snickerdoodle Cookie Cake Bars will piss you off if you're not careful enough!


Fresh out of the oven, they look fine and dandy, and smell inviting as well. A little handling makes you realise that Oreo crumbs are falling everywhere like goddamn apocalyptic mudslides.


Crises aside, the Oreo Snickerdoodle Cookie Cake Bars were a good turnout. Initially, I assumed that the bars would be some sort of cookie-but-a-cake-too baking breakthrough, with the bonus aspect of Oreo cookies. I'm not too familiar with Snickerdoodle cookies either, so I wasn't too sure what the cake version of it was supposed to be.

This is pretty much a butter cake with crusty outsides and additional Oreos, cut into little blocks for bite-sized enjoyment. The Oreos do more for its presentation rather than its taste, which is mainly of butter cake.

Before things started getting messy

The edges and corners are the best, be sure to keep those bits for yourself!

Oreo Snickerdoodle Cookie Cake Bars


Ingredients:

12 oreos (double stuff, obviously, if you can help it.)
192g flour
1 tsp cream of tartar
1/2 tsp baking soda
1/4 tsp salt
85g butter, softened
1/2 cup sugar (don't reduce this, it won't turn out too sweet, trust me.)
1/8 cup milk
1 tsp vanilla essence
1 egg


Instructions:

1. Pull apart the Oreos by twisting them. Set aside the cookie with the cream layer attached. Crumble the layer without the cream into fine crumbs.

2. Sieve and whisk together flour, cream of tartar, baking soda and salt.

3. Cream butter and sugar till light and fluffy. Add milk, vanilla essence and egg and beat till smooth.


4. Fold in the flour mixture till just combined. Your batter will be pretty stiff and airy.


5. Spread a thin layer of cookie dough onto a 8x6 inch baking dish (mine was a little glass casserole) lined with baking paper.


6. Arrange the side of the 12 Oreo cookies with the cream layer onto the cookie dough, cream side up. (They'll probably overlap a little) Spread the rest of the cookie dough on.


7. Sprinkle some of the Oreo crumbs over the dough (don't use all of it, otherwise your Oreo crumbs will avalanche all over your kitchen table. I learned the hard way.) and bake at 180 degrees Celsius for 40 to 45 minutes.


8. Remove from the baking dish and allow to cool on a wire rack. Cut into squares and serve.


I wonder whether, if we mix the crushed oreos with butter and keep it in the fridge for a bit, we could form a sort of Oreo-spread for the top, which would stay together in the behaviour of a cheesecake crust. That would be a good solution to an ineffective sparse sprinkle.


It's Singapore's annual 'Teacher's Day' tomorrow, and I'll be heading to my previous school with twelve pairs of these bars to hand out to certain teachers and friends. They look pretty enticing, don't they?

Wednesday, 10 April 2013

Chinese Peanut Cookies

Apparently today, April 9, is National Chinese Almond Cookie Day. I don't know who the heck comes up with these extremely necessary special days. I can understand if they decide to have International Chocolate Appreciation Day, or Cereal Day, but National Chinese Almond Cookie Day just doesn't make any sense to me as a legitimate day day. But whatever.


These are Chinese peanut cookies, which my mother often makes during the Chinese New Year period. (mid-February) They neither look, taste, nor feel like Chinese almond cookies, which, although I personally have not tried, seem to be flatter, crispier and obviously has a sweet almond fragrance instead of an earthy peanut one.

I've made these Chinese peanut cookies on two occasions so far, and they have gotten great feedback both times. Lots of this feedback comes from the voice in my head which goes, "Mmm..." after every cookie.

It all starts with this bad boy right here.

This cookies are best made with a friend or any other living thing which can provide you with an extra pair of functional hands, which will be ideal for the tedious task of rolling the cookie dough into Maltesers-sized balls.


Chinese Peanut Cookies
(makes 2-3 tupperware-boxes)

Ingredients

200g raw unsalted peanut (without skin)
300g plain flour
120g icing sugar
1 1/2 tsp baking soda
3 tsp baking powder
2 tbsp creamy peanut butter
175ml peanut oil
1 egg  - lightly beaten (for glazing)

Method

1. Spread the peanuts on a baking sheet and roast in the middle of a preheated oven at 175C for 15 to 20 minutes, stirring them once or twice during cooking time. (If your peanuts are salted, rinse them with water and dab them dry before placing them in the oven.)
2. Crush the peanuts very finely, until they are as close as possible to powder form. (This is going to take forever, be prepared. Unless you have a fancy appliance like a food processor or whatever.)
3. Put all the above ingredients (sift the flour and baking soda and powder) and the roasted ground peanuts (except for peanut oil and egg) into a big mixing bowl and mix well. Heat the peanut butter slightly for easier mixing.
4. Add peanut oil and mix it into a dough.
5. Roll and gently press (the dough is quite fragile) them into marble-sized balls and place on ungreased baking trays.
6. Egg wash them before baking in preheated oven at 175C for 15 to 20 minutes or until slightly browned. 
7. Cool on trays and put them in an air tight container.


Roasting peanuts


The fragrance will fill your kitchen like no other.

Look at me trying to be all creative.

Dad: It looks like the Incredible Hulk.

2013 is the year of the serpent.

 The result of all this hard work is loads and loads of melt-in-your-mouth, bite-sized cookies which are just firm enough to hold, but crumble immediately as you bite into them, disintegrating into buttery, nutty goodness.

If you don't have a blender or food processor, you are stuck with a rolling pin and a ziploc bag. During my second time making these cookies, I gave up with the crushing and ended up with a few crumbly bits of peanut, which I could feel in the end product, which disturbed the powdery, little-particle texture of the cookie. A sieve is a good tool to use to ensure that the peanuts are close to powder-form.

You can find peanut oil in most Asian supermarkets.

Enjoy!

Sunday, 27 January 2013

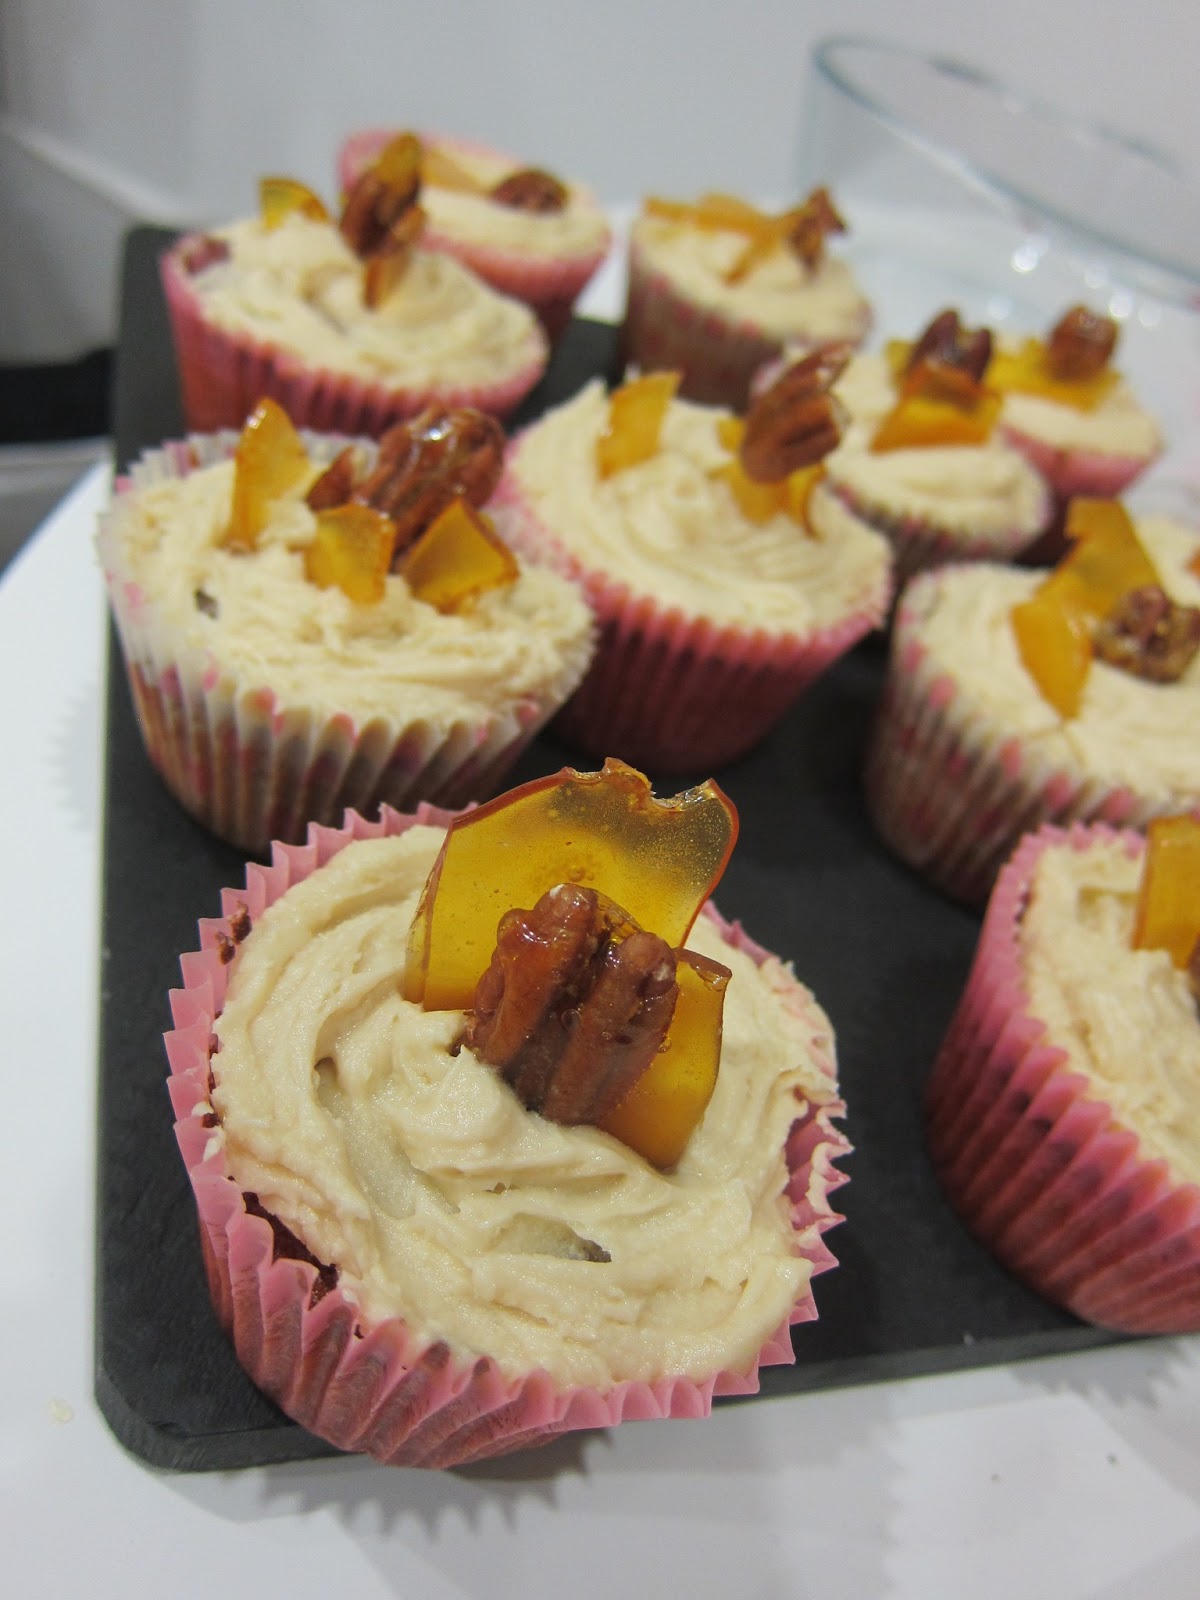
Maple and Pecan cupcakes

Recipe from abakedcreation


Get some pretty cupcake liners and place them in a patterned order for no particular reason.


Chop up some pecan nuts, then realize that crushing them in a plastic bag would've been easier, quicker and less messy.


Add some maple syrup to cupcake batter and take a big sniff.


Put in more stuff, as well as the pecan nuts, and wonder why the batter looks like a puddle of sick.


Make a cool-ass caramel and pecan card and hold it up in wonder.


Wonder why caramel is so magical.


Like, magic.


Take more pictures because you can't believe it.


Think that it looks like a nut army swimming in beer.


Take a deep breath and try to crack the card evenly.


Tell yourself that you succeeded,


sort of.


Eat some bits of caramel.


(I'm running out of instructions)


...


Stop playing with the caramel and fetch your cupcakes from the oven.


Slab maple buttercream on the cupcakes and stick the caramel and pecan chunks on them.


Feel proud.


Very proud.


Take pictures from all sorts of angles.


MAPLE AND PECAN CUPCAKES
(adapted from abakingcreation)

To make the [12] cupcakes:

Ingredients


60g of pecan nuts
110g unsalted butter, room temperature
40g brown sugar
160 ml pure maple syrup
2 eggs
115g self-raising flour


Instructions

  1. Put the pecan nuts in a plastic bag and crush them with your fingers or a rolling pin, but not too finely (see photo above). If you want to look more like a professional and less like an angsty madman, you can use a knife to chop them up.
  2. Preheat your oven to 180°C and line your tray with cupcake liners.
  3. Using a mixer, cream the butter and brown sugar until smooth.
  4. Pour in the maple syrup and mix well.
  5. Add in the eggs one at a time and mix until incorporated.
  6. Gently fold the sifted self-raising flour into the batter until well incorporated.
  7. Fold in the chopped pecans.
  8. Use an ice cream scoop to evenly distribute your batter into the liners, filling them about 2/3 full. (I just poured them, it will come up to the right amount for 12 cupcakes if you have functional estimation skills)
  9. Bake for 20-25 minutes or until a cake tester (i.e. toothpick or a stray fork) comes out clean.
  10. Let the cupcakes cool while you make icing and toppings.

To make the caramelized pecan toppings:

Ingredients

60g granulated sugar
12 pecan halves (what you get in packets are already halves)

Instructions

  1. Pour the sugar in the middle of a heavy-based saucepan and heat it until it turns a pale golden-brown colour. Do not stir with a spoon, but you can tilt the pan to spread the caramel. Do not let the caramel burn into a dark-brown colour.
  2. Spread the pecans on a non-stick pan or a silicon baking mat, and evenly pour the sugar over the pecans immediately after removing it from the heat.
  3. Leave it to cool and harden. Once caramel is ready, remove from mat/pan and break into even pieces.

To make Maple syrup buttercream icing:

Ingredients

110g unsalted butter, room temperature
2 cups icing sugar
1/4 cup pure maple syrup

Instructions

  1. Using a mixer, beat the butter and icing sugar until smooth.
  2. Gradually add in maple syrup and continue mixing until it becomes smooth buttercream.

And we put it all together!

If you have a piping bag, you'll have prettier cupcakes. As you can see, this isn't in the recipe's font because I trust you should know what to do with the three components which you've got. But if you have no basic common sense, what you do is you spread/pipe the buttercream on top of the cupcake, (try not to spread them all the way to the edges like I did) and stick the caramelized pecans on top of the icing, as well as remaining caramel bits.

I have reduced the amount of sugar in the cupcake recipe, to play it safe when faced with maple syrup.

These cupcakes are absolutely delicious. The combination of maple and pecan never fails to impress, and the nuts in the cupcake give a delightful crunch to it. It is so much fun to make, especially with the caramelized pecans. I'm definitely doing this again, when I have recovered from my sugar rush.

Wednesday, 26 December 2012

Death by pancakes

I don't know what the worst pancakes ever are, but I might have ventured close to that field today.

Remember the time I tried making pancakes without a recipe at Adel's house? Those were made of milk and flour. I tried that again today by getting a big bowl, pouring in the remaining milk we have at home, spooning in an unknown amount of whole wheat flour, cracking in an egg, putting in some sugar, and two tablespoons of baking powder, in hope that they'd fluff up in the pan.

Oh, and I put in three crushed Oreos as well.

I swear, I buttered the frying pan, but the first pancake – I don't even know what that was, other  than something like a grey and squishy heap of scrambled eggs.

There are no pictures in this post. I couldn't bring myself to digitally record today's pancake "adventure".

I swapped to a non-stick pan, and the pancakes turned out as one flat piece...

... of grey rubber.

That was literally what it felt and looked like. The oreo biscuits 'dissolved' into the batter, turning it grey, plus the whole wheat flour made everything brown, so we have the two least vibrant colours in the world plus a bad texture, in a circular shape – that's nothing too far from a rubber disk.

To make myself feel better about the pancakes, I sprinkled chocolate chips on top of each pancake while it was in the pan, so that I can say, "these pancakes are bad but hey look there are chocolate chips in them," which I did, to my mum and brother.

They were edible, but I think I'm going to stick to recipe the next time I try to make pancakes.

Saturday, 22 December 2012

More baking ensues


... and this time I have another go at the Maple and Pecan Pie, as well as a Greek Honey Pie, or Melópita.

I did the pecan pie again because my brother who comes home on weekends wanted to have a slice, but there was no way I could have kept it for a whole week without finishing it.

This time, my mum told me that the pure maple syrup was out of bounds, (it's expensive) so I had to resort to the cheap old maple-flavoured syrup. It didn't taste as good and maple-y, but it's a maple and pecan pie, which still tastes good no matter what happens to it, so hey.


My my, that is one ugly pie

In this round, disaster happened. Trying to improve my pie, I went ahead and toasted the pecans prior to baking, placing them on the topmost rack in the roaster oven. They quickly burnt and I ended up scraping the blackness off each nut! That made the nuts edible, but there was still a burnt taste. It was a moment of despair, as pecan nuts are expensive in Singapore, and my mum never hesitates to remind me of the fact. Either way, I finished the last bit of pecan which has become part of the pie. And that pie was good.

You're welcome for the foodporn

The texture was less runny, maybe because the syrup used was thicker, and I had it in the oven for a long time. The shortcrust pastry was crumbly and annoying, so I'm going to intensely study this video of Gordon Ramsay bouncing on his toes like he's on crack while demonstrating the correct way to make a shortcrust pastry pie shell.


I put the pecan pie aside and worked on the 'honey pie' recipe I found on foodgawker, which looked relatively simple and interesting, so I tried it.


Adapted from cookmegreek.

Melópita

4 medium-sized ramekins

250g soft ricotta cheese (or cottage cheese if you're on a budget)
65g honey
2 eggs
~ ⅓ tbsp corn flour
Tiny pinch of salt
Drop of vanilla

more honey and cinnamon to serve (optional)

Preheat the oven to 180°C.
In a bowl mix all ingredients with a whisk wire or just a fork, until completely incorporated.
Butter the insides of the ramekins, and pour mixture evenly into each one.
Bake for 30-40 minutes or until golden.
Serve Melópita warm or at room temperature drizzled with honey and dusted with cinnamon.


To be honest the outcome tasted just like mini regular baked cheesecakes to me. I might experiment more with this recipe... maybe it needs a little more honey or something, to have it actually taste like a honey pie rather than just plain old cheesecake. The cinnamon and honey toppings do switch it up a bit, so I recommend having those on top. Even if you don't like cinnamon. Put it on, so that it tastes exotic and different, at the very least.

That's it for the amateur baking disaster report and just remember: do not toast nuts on the topmost rack of the toaster oven. Do not toast anything on the topmost rack of the toaster oven. Do not even put the rack on the topmost shelf of the toaster oven. But yes you can still use the toaster oven.
Related Posts Plugin for WordPress, Blogger...